

First, what is schema markup?
Schema markup is basically pieces of code that you add to your website to let Google (and other search engines) gather information about your website and business that it might not have been able to without it.
Schema markups main benefit is that it can be used to make your website listing on Google stand out more. This is because your listing is more eye-catching or takes up more space in Google. With it, you have a higher chance of someone clicking through to your website.
For example, as you can see in the image below metropolitianplumbing.com.au stands out more from their competitor melbourne24hourplumbing.com.au because they have star ratings displayed on their Google listing.
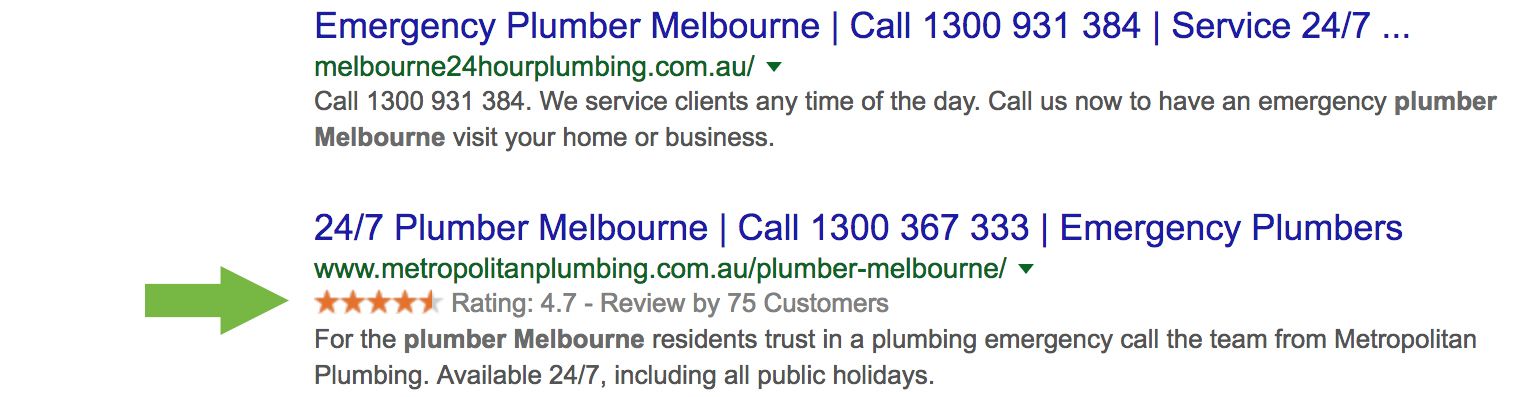
Those star ratings are there because of the schema markup metropolitianplumbing.com.au have added to their website.
Local Schema markup also helps with local SEO.
In this post, I’ll cover all the different types of schema markup your local businesses website will need and show you various ways to implement each type, starting with the rating schema markup you see above.
While you don’t need all the schema markups I have listed below, you should at least as a minimum have the first 3 to stand out from the crowd on Googles search results page.
Note:
There are 4 different ways you can add schema markup to your website. You can either use microdata, RDFa, JSON or some sort of plugin.
In this post to keep things simple, I will cover the easiest ways to implement each schema markup type into your website using non-technical terms for better understanding.
If you have come here to learn one specific markup you can use the navigation below.
Jump to:
- Ratings & Reviews, Product/ Service Markup
- Local Business Markup
- Site Navigation Markup
- Organisation Markup
- Breadcrumb Markup
- Website Markup
Ratings And Reviews, Product/ Service Markup
As promised I’ll start off with the schema markup I showed you in the intro.
What it does: Shows the star ratings in Google. Here is the image again just to refresh your memory.
Important notes:
- While the exact number of reviews and average rating isn’t checked by Google directly, you must be honest. If you claim to have 134 reviews all with 5-star ratings and Google know you have very few online reviews they won’t show your star ratings in the search results page. Be honest on your review numbers and average ratings.
- It’s safest to count reviews from trusted sources such as Facebook, Yellow Pages, True Local & Google My Business.
- You should also put a review or two on the page you are adding this schema to. This will increase its credibility and increase the chances of Google showing the rating stars on the search results page
Setup steps:
Place the code below anywhere in the HTML body of your product or service page/ pages.
Replace the capital letter sections inside the quotation marks with your info.
<script type="application/ld+json">

{ "@context": "https://schema.org",

"@type": "ENTER EITHER Product OR Service",

"name": "PRODUCT OR SERVICE NAME E.G. BOOK KEEPING",

"description": "PRODUCT/ SERVICE DESCRIPTION",

"provider": {

"@type": "LocalBusiness",

"name": "YOUR BUSINESS NAME"

},

"areaServed": {

"@type": "State",

"name": "YOUR STATE. Note: if this is for a product not a service them remove this section (this sections cinsists of this line, 2 lines above and one line below)"

},

"aggregateRating":

{"@type": "AggregateRating",

"ratingValue": "YOUR AVERAGE REVIEW RATING FROM SOURCES SUCH AS FACEBOOK, YELLOW PAGES AND GOOGLE E.G. 4.9",

"reviewCount": "NUMBER OF REVIEWS YOU HAVE E.G. 7"

},

"review": [

{

"@type": "Review",

"author": "NAME OF THE PERSON LEAVING THE REVIEW",

"datePublished": "REVIEW DATE E.G. 2017-05-04",

"reviewBody": "THE REVIEW ITS SELF",

"reviewRating": {

"ratingValue": "REVIEW RATING E.G. 4"

}

},

{

"@type": "Review",

"author": "NAME OF THE PERSON LEAVING THE REVIEW",

"datePublished": "REVIEW DATE E.G. 2017-05-04",

"reviewBody": "THE REVIEW ITS SELF",

"reviewRating": {

"ratingValue": "REVIEW RATING E.G. 4"

}

}

]

}

</script>
If you don’t want to add in a couple of reviews and the extra information you can take parts out to keep it simple like the code below.
Using the code below may have a lower chance of being shown on the search results page.
<script type="application/ld+json">

{ "@context": "https://schema.org",

"@type": "ENTER EITHER Product OR Service",

"name": "PRODUCT OR SERVICE NAME E.G. BOOK KEEPING",

"description": "PRODUCT/ SERVICE DESCRIPTION",

"aggregateRating":

{"@type": "AggregateRating",

"ratingValue": "YOUR AVERAGE REVIEW RATING FROM SOURCES SUCH AS FACEBOOK, YELLOW PAGES AND GOOGLE E.G. 4.9",

"reviewCount": "NUMBER OF REVIEWS YOU HAVE E.G. 7"

}

}

</script>
Local Business Markup
What it does: Local business markup tells google about your basic business details.
While this doesn’t change your listing much in Google it will build your trust with them. This is because having a consistent name, address, business hours, phone number etc.. across your website, social accounts, Google My Business listing and online directories build Googles confidence in what your business is about.
Google’s confidence and trust in a website are used as ranking factors.
WordPress plugin setup (recommended if you use WordPress):
- Install the JSON Schema Markup plugin by Kazuya Takami.
- Go to the plugin settings > select ‘Local Business’ > check ‘Enable’ & output on all page.
- Leave ‘Local Business Type’ as LocalBusiness.
- Fill out the rest of the settings (you can leave the Geo settings and price range empty). If you want to know your business geo location visit. www.latlong.net.
- Hit save.
Manual setup:
If you don’t have a WordPress website there are 2 ways to manually setup Local Business Markup.
Option 1 is using itemprop in your footer:
Use this method if you already display your business details in the footer of your website.
Simply add an itemprop to the HTML of each piece of information to tell Google what it refers to and wrap it in a div with itemscope itemtype="https://schema.org/LocalBusiness". As you can see in the example below.
Before:
<h1>Business Name</h1>

<p>Business Description</p>

<p>Open: <time>Monday-Friday 9am-5pm</time></p>

<p>Phone: <span>123 456 789</span></p>

<address>

<span>123 Your Street</span>

<span>Suburb</span>,

<span>Vic</span> <span>3000</span>

</address>

</div>
After:
<div itemscope itemtype="https://schema.org/LocalBusiness">

<h1 itemprop="name">Business Name</h1>

<p itemprop="descripton">Business Description</p>

<p>Open: <time itemprop="openingHours" datetime="Mo-Fi 09:00-17:00">Monday-Friday 9am-5pm</time></p>

<p>Phone: <span itemprop="telephone" content="+123456789">123 456 789</span></p>

<address itemscope itemtype="https://schema.org/PostalAddress" itemprop="address">

<span itemprop="streetAddress">123 Your Street</span>

<span itemprop="addressLocality">Suburb</span>,

<span itemprop="addressRegion">Vic</span> <span itemprop="postalCode">3000</span>

</address>

</div>
Option 2 using JSON code:
Apply the following code to your footer and replace the capitalised text with your details.
<script type="application/ld+json">

{

"@context": "https://schema.org",

"@type": "LocalBusiness",

"address": {

"@type": "PostalAddress",

"addressLocality": "SUBURB",

"addressRegion": "STATE SHORTCODE E.G. Vic",

"postalCode":"POSTCODE",

"streetAddress": "STREET ADDRESS"

},

"description": "BUSINESS DESCRIPTION. YOU CAN REMOVE THIS LINE IF YOU DON'T WANT TO ADD A DESCRIPTION",

"name": "BUSINESS NAME",

"telephone": "BUSINESS NUMBER",

"openingHours": "OPEN HOURS E.G. Mo,Tu,We,Th,Fr 09:00-17:00",

"geo": {

"@type": "GeoCoordinates",

"latitude": "VISIT www.latlong.net TO GET LATITUDE",

"longitude": "VISIT www.latlong.net TO GET LONGITUDE"

},

"sameAs" : [

"https://www.facebook.com/example",

"https://www.twitter.com/example",

"https://plus.google.com/example",

]

}

</script>
Make sure the info such as your business hours matches up with your Google My Business information for best SEO results.
Remember to test it on https://search.google.com/structured-data/testing-tool and double check the info is correct.
Site Navigation Markup
What it does: Shows menu links in the Search results page (mainly for branded searches).

WordPress plugin setup steps:
Install the JSON Schema Markup plugin.
Once it’s installed go to the plugin settings > select ‘Site Navigation’ > check ‘Enable’ & output on all pages > select the main menu you have for your website > hit save.
Manual setup steps:
To apply it manually you need to edit your navigation menu’s HTML.
It’s easiest if your menu is in an HTML list format. From there you just need to add the following:
- Add
itemscope itemtype="https://www.schema.org/SiteNavigationElement"to your unordered list (ul) tag - Add
itemprop="name"to your list item (li) tags - Add
itemprop="url"to your anchor (a) tags
Here is an example:
Before
<ul">

<li><a href="https://www.your-site.com.au/about">About</a></li>

<li><a href="https://www.your-site.com.au/our-experts">Our Experts</a></li>

<li><a href="https://www.your-site.com.au/contact">Contact Us</a></li>

<li><a href="https://www.your-site.com.au/special-deals">Special Deals</a></li>

</ul>
After
<ul itemscope itemtype="https://www.schema.org/SiteNavigationElement">

<li itemprop="name"><a itemprop="url" href="https://www.your-site.com.au/about">About</a></li>

<li itemprop="name"><a itemprop="url" href="https://www.your-site.com.au/our-experts">Our Experts</a></li>

<li itemprop="name"><a itemprop="url" href="https://www.your-site.com.au/contact">Contact Us</a></li>

<li itemprop="name"><a itemprop="url" href="https://www.your-site.com.au/special-deals">Special Deals</a></li>

</ul>
Organisation Markup
What it does: Shows information about your business such as logo, number and social accounts on certain branded searches. Below is an example when searching ‘Commonwealth Bank’.

Easy steps to apply (WordPress Plugin):
The 2 best FREE plugins to use are the Yoast SEO plugin and the JSON Schema Markup plugin by Kazuya Takami.
The Yoast plugin applies it to your website automatically when you run through its configuration wizard setup process (Yoast > General > Configuration Wizard).
To apply it with the JSON Schema Markup plugin, simply install the plugin > go to the plugin settings > select ‘Organisation’ > check ‘Enable’ & output on homepage > fill out as many fields as you can > hit save.
Hard steps to apply (manual setup):
If you don’t have a WordPress website then follow the steps below.
Paste the following code into the HTML body of your homepage and fill out the CAPITAL LETTER sections inside the qutation marks with your businesses info without removing any quotation marks.
Note: Not all info needs to be there. You can take some sections out if you don’t have the info or you would like to keep it private (such as your address if you don’t have a store location).
<script type="application/ld+json">

{ "@context": "https://schema.org",

"@type": "Organization",

"name": "BUSINESS NAME HERE",

"legalName" : "BUSINESS LEGAL NAME E.G. Business NAME LLC",

"url": "https://www.YOUR-WEBSITE.com.au",

"logo": "URL TO YOUR LOGO E.G. https://www.YOUR-WEBSITE.com.au/wp-content/uploads/2017/04/logo.png",

"foundingDate": "YEAR YOUR BUSINESS WAS FOUNDED E.G. 2009",

"founders": [

{

"@type": "Person",

"name": "YOUR NAME"

},

{

"@type": "Person",

"name": "YOU CAN ADD MORE NAMES IF THERE ARE MULTIPLE FOUNDERS OR REMOVE THIS LINE AND THE 3 ABOVE IT IF THERE IS ONLY 1 FOUNDER"

} ],

"address": {

"@type": "PostalAddress",

"streetAddress": "STREET NUMBER AND NAME",

"addressLocality": "SUBURB",

"addressRegion": "STATE CODE E.G. VIC",

"postalCode": "POSTCODE",

"addressCountry": "COUNTRY CODE E.G. AU"

},

"contactPoint": {

"@type": "ContactPoint",

"contactType": "E.G. customer service",

"telephone": "PHONE NUMBER",

"email": "EMAIL"

},

"sameAs": [

"REMOVE THIS TEXT AND LIST YOUR SOCIAL ACCOUNTS ON EACH LINE E.G.",

"https://www.facebook.com/FACEBOOK-PAGE",

"https://www.twitter.com/TWITTER-PAGE",

"https://www.linkedin.com/company/LINKEDIN-PAGE",

"https://plus.google.com/G-PLUS-PAGE"

]}

</script>
Remember to test it https://search.google.com/structured-data/testing-tool and double check the info is correct.
Breadcrumb Markup
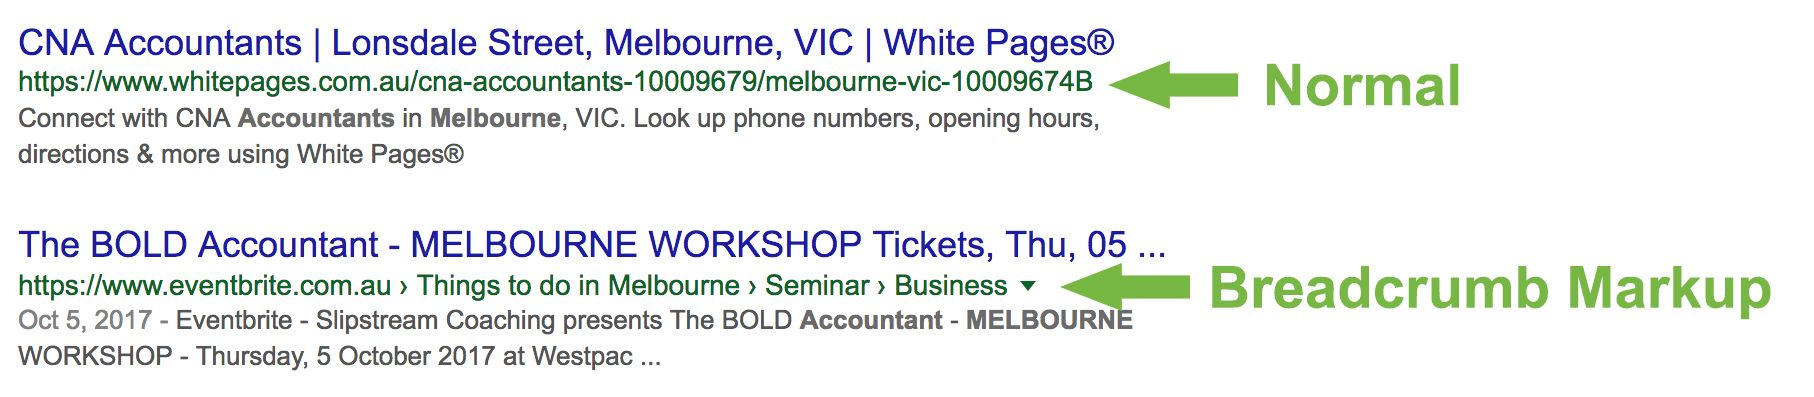
What it does: Shows URLs in google as breadcrumbs instead of directly displaying the URL.
For example, a normal URL of ‘your-site.com.au/commercial-plumber/frankston’ will show as ‘your-site.com.au > Commercial Plumber > Frankston’.
You can see in the image below the structure of the Green URL is different for eventbrite.com.au.
This isn’t the biggest difference and isn’t worth applying if you have to do it manually. The only time this is worth adding is if you have WordPress and a schema plugin already installed that applies it with the click of a button.
Setup steps:
If you have been adding schema with the JSON Schema Markup plugin then you can go to the plugin settings > select ‘Breadcrumb’ > check ‘Enable’ & output on all pages > hit save.
If you don’t have a WordPress website and really want the Breadcrumb Schema Markup here is the official documentation on how to apply it manually.
Again, personally, I only think this is worth the time if it only takes the click of a button to activate. The return you will get for the time spent manually applying it to every page might not be worth it.
Remember to test it https://search.google.com/structured-data/testing-tool and double check the info is correct.
WebSite Markup
What it does: It shows a little extra information about your website in the search results page on certain branded searches and can show a search box on your website listing in Google.
Although the search box isn’t shown much anymore this schema is easy to implement so why not?

Easy steps to apply (WordPress Plugin):
The same 2 plugins you can use to apply it for Organisation Markup you can use to get Website Markup
The Yoast plugin applies it to your website automatically when you run through its configuration wizard setup process (Yoast > General > Configuration Wizard).
To apply it with the JSON Schema Markup plugin, simply install the plugin > go to the plugin settings > select ‘Web Site’ > check ‘Enable’ & output on homepage > Leave the rest > hit save.
Manual setup steps:
Paste the following code into the homepage body and fill out the capitalised sections with your businesses info.
<script type="application/ld+json">

{

"@context": "https://schema.org",

"@type": "WebSite",

"url": "https://www.YOUR-SITE.com.au/",

"name": "NAME IF YOUR BUSINESS",

"description": "YOU CAN REMOVE THIS LINE IF YOU DONT WANT TO ADD A DESCRIPION",

"potentialAction": {

"@type": "SearchAction",

"target": "https://www.YOUR-SITE.com.au/?s={search_term_string}",

"query-input": "required name=search_term_string" }

}

</script>
If you don’t have a WordPress website you will need to replace the target (https://www.YOUR-SITE.com.au/?s={search_term_string}) and query-input (required name=search_term_string) lines with the right parameters for your website’s site search functionality.
Remember to test it in https://search.google.com/structured-data/testing-tool and double check the info is correct.
Quick Mentions
Blog Post Markup:
If you have a blog on your website that you post on regularly you can add blog post markup (not to be confused with news article markup).
This allows Google to display information such as the author and publish date in the search results page.
For WordPress websites, there are plugins that can add this to your website but a large amount of them break your blog post pages so you need to be careful.
Manually adding Blog Post Markup can be a bit tedious and may not be worth the time. Every new blog post you write will need extra time dedicated to it adding the blog post schema markup.
PostalAddress Markup:
The main role of postal address markup is to add an extra confirmation to Google on where your business is located
This markup is added in the Organisation Markup and Local Business Markup. If you have added either of these to your website then you can ignore this all together.
If you don’t have either of these Markups on your website but want to add postal address markup then paste the code below into the footer of your website so it is added to every page.
<script type="application/ld+json">

{ "@context": "https://schema.org",

"address": {

"@type": "PostalAddress",

"streetAddress": "STREET NUMBER AND NAME",

"addressLocality": "SUBURB",

"addressRegion": "STATE CODE E.G. VIC",

"postalCode": "POSTCODE",

"addressCountry": "COUNTRY CODE E.G. AU"

}}

</script>
Summary
Whether you implemented some of the Schema Markup listed above or all of the schema markup listed above you are now one step ahead of most of your competition.
If you run into any errors while testing your schema markup leave a comment below and I’ll help you out.
If you’re a small business owner in Melbourne check out our must-read FREE ebook: 21 Mistakes Melbourne Small Businesses Are Making Online in 2017.


